Thursday, August 25, 2011

Summer 2011: clear eyes, full hearts...

This summer in between my Urban Conservation Unit (UCU) tasks, initiating new research sites for my project, and assisting the Water Resource Team with erecting the field plot, I also had an opportunity to collaborate with Kaileigh Calhoun, this year's NSF Research Experience for Undergraduates (REU) student.


Auspicious beginnings

Everything I needed to know about Kaileigh I learned in her first days among us. Not afforded a formal office early on, her work space was set up in the high traffic counter area of the Water & Soil building. No sweat! Whenever I passed through, there she was, working. And at instances when an office became available (such as mine while on my jaunts) she was there to put the computer to good use – focused on her project and the task at hand. I should also note that she’s a natural born blogger – taking to the REU program’s emphasis on documenting the research experience with gusto.

Team player

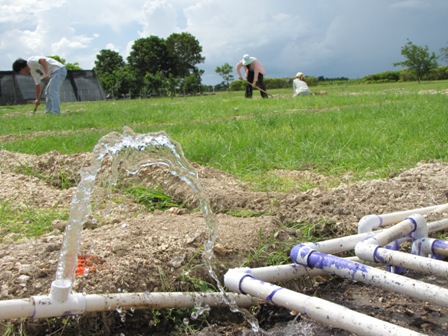
Joining the Water Resource team in early June, Kaileigh dedicated her time at TREC to addressing a data discrepancy within in the mountains of information generated by the equipment in the Snapper Creek Project - located just off Snapper Creek in a suburb of Miami-Dade. In addition, she also had the opportunity to get her hands dirty with the rest of our group in our various on-going tasks...


learning the ins and outs of the Snapper Creek gear with Tina,


braving the summer’s worst in C-111 with Isaya,

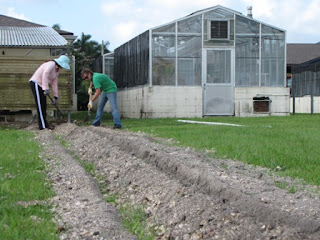
contributing to the field plot’s beginnings with Nicki,


...and in her final days with us, a riding-along on site visits with the UCU.


Let’s make a movie!


Just before the end of her tenure here, Kaileigh and I collaborated on a short video about her project – Correction of the Analysis of HFP01 Heat Flux Sensor Data Collected during Periods of Rainfall. Highly conceptual, I was somewhat concerned about how we would tackle the subject visually. No sweat! She shared her mid-point presentation with me for brainstorming, she was helpful during pre-production meetings, and once shooting began – always early or after hours and surrounded by hungry mosquitoes - she proved a patient and camera-ready trooper, poised and fearless.


It goes without saying, she is missed. And if this is the caliber of talent the REU program attracts, then I hope it continues and I look forward to next summer. You can view the aforementioned video here, and a poster of her project, the product of Dr. Kati Migliaccio’s close mentoring, here.


a traditionalist at heart, Kaileigh sends thanks via epistle


But wait there's more


I would be remiss if I didn’t also recognize our other recently departed team members.


Profa. Dra. Teresa Cristina T. Pissarra

Based in Brazil, Teresa arrived early this year to perfect her work on watershed modeling. Among other things, she is also a talented photographer, a fact which won me over instantly!


David Li


David, a senior computer engineering student at Georgia Tech, joined the team this summer to work on the development of an interactive, web-based irrigation tool to be integrated into the FAWN web interface. His contribution was also critical to the successful completion of the field plot this summer. Look for the irrigation tool to debut this fall!


Learn about 2010’s REU marvels here.

Friday, August 19, 2011

Richards pressure plate experiment: developing soil water retention curves in 10 easy steps!

The C-111 project requires the development of soil water retention curves for the dominant soil types at the study site (i.e., Krome, Chekika and Marl). The low pressure (i.e., suction less than 1 Bar) portion of the soil water retention curve is developed using the Tempe cell apparatus and the high pressure (i.e., suction greater than 1 Bar) portion of the graph is determined using the Richards pressure plate. What follows is a brief description of the Richards pressure plate process.


Richards pressure plate: large & in charge


Note: precede operation by reading the user manual's guide on assembling and safely using the Richards plate because it involves very high pressure.


Operating the Richards pressure plate involves the following steps:

1. Place a layer of water on the Richards pressure plate cell and let it stand overnight to ensure the cell is fully saturated.


2. Prepare the soil by sieving with a 2 mm round-hole sieve to make 25 gm replicate samples of the soil under study. The pressure plate cell used in this experiment can fit up to 12 samples (or retaining rings). Note: before placing samples into Richards’s pressure plate connect the outlet tube.


3. Use a spatula to place the samples into the retaining rings to avoid particle size segregation. Pouring out the sample creates a non-representative sample.


4. Level the soil in the retaining rings and raise the depth of water to completely saturate the soil samples from the bottom and let stand overnight.


5. The next day, when samples are fully saturated, remove excess water from the plate using a syringe and plug all unused outlet ports. Then carefully fasten the black o-ring.


6. Seal the chamber by fastening the bolts. Be sure the bolt heads are properly set in the groves.


7. Place the outlet tube into a water holding container (e.g., a graduated cylinder).


8. Gradually increase pressure to the required setting and take precautions not to exceed the maximum pressure of the pressure plate cell inside the chamber.


9. When equilibrium is attained (i.e., no water flows from the outlet tube) turn off the pressure supply to the system. DO NOT open the chamber until all pressure has been released. Immediately record sample weights.


10. Transfer the samples to an oven and dry the samples at 105 C for 24 hours. Record the weight after oven drying.


Success! Now the math! As a final step, calculate the soil water content using the pressure at which the experiment was initiated.


Isaya Kisekka


For more on the C-111 project, see:


Monday, August 15, 2011

Update on C111 data collection during summer of 2011

C111 has been interesting this summer. Despite battling many mosquitoes, braving high temperatures and humidity, tromping through the mud and dense vegetation, we are on schedule with weekly data collection.
We have noticed a lot of surface ponding at the monitoring sites next to Loveland Slough, and VM3.
Over summer the fields have not been under active crop production, but we have recently seen growers plowing the fields signaling that the next growing season is soon approaching.


Isaya downloading Enviroscans at site VM4


Tina tromping through the mud at site VC1


Isaya reducing the vegetation growth at site VM3


Surface ponding in fields adjacent to Loveland Slough


Surface ponding next to VM3


Growers beginning to prepare the fields


Monday, August 8, 2011

Nicki’s Field Study, Phase II: let’s get wet!

Over the past three weeks the field plot study site work has barreled forward, with this most recent phase concentrating on getting water to all the lines already assembled and in the ground. What follows is a brief account – from Hydrolab to field – of how it all went down.


Citra, FL: the inspiration


If you build it, they will come


Once Manny assembled two sturdy wooden benches and a timer stand out in the plot site, the onus fell on the Water Resource Team to put some gear on those bad boys!


Les valves


In order to reduce the leak factor, 1” slip valves, courtesy of Hunter Industries, are the valve of choice for the field study site. Attached to these are water meters (for water-use data per plot) and pressure gauges (for insight on plot psi).


All these parts were carefully assembled in the lab and then brought to the field for the greater task of constructing two giant manifolds (each corresponding to 8 reps), to be prominently displayed on the elevated benches.


Before this could take place, the mainline to the site was affixed with a particle filter and then extended to each bench, reducing from 1.5” to 1” PVC at the valves.


Manifold destiny


To maximize the platform space, the PVC pieces joining the valves together were precisely measured.


Eight valves are equidistant on the platform, each reducing from 1" to 3/4" PVC at the water meter and then running a line down the bench's side and then meeting with a field line at ground level near the field line trench.


at dusk, with all valves in place, Nicki inaugurates the mainline


The flush and funny


With each valve now capable of sending water to a specific plot rep, work began on preparing for sprinkler head installation – in this case, the MP1000 multi-stream spray head courtesy of Hunter Industries.


MDC UCU Jesus Lomeli, resplendent in orange, makes a cameo


Following a brief pep talk by Mike about how easy and forgiving funny pipe can be with respect to head location along the trench, the Water Resource Team set about proving the exact opposite in the field!


One footnote: had head fittings on the field lines been located at exactly the same place, and a good distance from the known head location along the trench, the funny pipe would have performed as prescribed. Next time!


Lines were flushed, funny barbs and pipe were attached, and MP rotators affixed and buried in place.


MP1000 in all its glory

The saga continues


Tune in next time for: timer and valve wiring and lysimeter prototype trial!